Bonnell Dress in Blue

I’d been eyeing the Bonnell Dress from Dixie DIY ever since it was announced. What can I say? Those side cut-outs called to me. Plus it’d been ages since I made a straight-up quilting cotton sundress in a novelty print.

IMG_6711

So I made one!

IMG_6705

I made a straight size 6 (and no muslin, because I like to live on the edge). The only modification I made was to lower the front neckline slightly.

IMG_6703

The fit is pretty good, although I think I might go down to a size 4 next time for a snugger fit. I’ll probably lower the front neckline even more next time, too–as it is, it sits very high, even for a jewel neckline.

IMG_6707

I was really pleased with how the side cut-outs turned out. To me, it was absolutely worth it to buy this pattern just to get the instructions for how to neatly finish those cut-outs (definitely an exercise in sewing origami). I can picture myself adding cut-outs to the sides of all kinds of things now, haha.

IMG_6713

I really like this fabric, too. It’s a Cotton and Steel print that I found at Stonemountain and Daughter. It is a quilting cotton, but it is quite light and drapey as quilting cottons go. Perfect for a sundress.

IMG_3370

I lined the bodice and skirt with gray cotton batiste. Here’s a close-up of the zipper and the nifty tag:

IMG_3372

Thanks for reading!

IMG_6709

Archer 2.0

I made another plaid shirt!

IMG_1582

Of course it’s another Archer. Do you even need to ask?

IMG_1575

The first Archer I made turned out a little boxier/looser than I wanted, so I cut one size smaller this time (a 4 instead of a 6). (To be fair, though, my first Archer has shrunk just enough, after multiple washings, that the fit is pretty great now. I’m going to be more careful about not shrinking this one too much!)

IMG_1572

Pattern modifications: narrowed the shoulders by about 1/2″, added 1/2″ of length at the lengthen/shorten line, added ~1/4″ of width on each side of the back at the hips tapering to nothing at the waist, graded down to a 0 at the cuffs, shortened sleeves by some amount that I don’t remember offhand. I think I may have overdone it on the sleeve-shortening, but I wear my button-ups with the sleeves rolled up 98% of the time anyway, so it’s all good.

IMG_1566

Want to know what part of this make I’m proudest of? Here, let me show you:

IMG_1579

See the pocket? NO? WELL THAT’S BECAUSE THE PLAID-MATCHING ON THAT SUCKER IS PRETTY PHENOMENAL, if I do say so myself, and I am super proud of it. Which I realize is kind of weird because, you know, it’s really hard to see from far away, so probably no one will ever notice it. Whatever. I know it’s there, and it makes me happy.

IMG_1570

I noticed one weird thing while I was cutting those pocket pieces–I think the pocket piece is drafted with 1/2″ seam allowance, when it’s supposed to have 1/4″ seam allowances (according to the directions). If you cut the pocket piece as drafted and turn under 1/4″, the finished pocket ends up being wider than the pocket placement line indicates the pockets should be. Not a big deal at all, but something that I noticed and was briefly confused by when I was trying to figure out how to match the plaid on the pockets and the shirt fronts. (It’s also entirely possible I messed up somehow, so take all that with a grain of salt.)

IMG_1586

Other than that, it came together really nicely. I’ve been wearing it tons since I finished it last month–if that’s not the sign of a successful make, I don’t know what is.

IMG_1567

P.S. I realized recently that I never got around to sewing a “Umbellularia Designs” tag into this shirt! Must fix that soon. :)

A Floral Flora

I’m pretty excited about this dress. :)

IMG_6570

This is the Flora Dress by By Hand London. It’s a combo of the wrap bodice from version 1 and the high-low skirt from version 2.

IMG_6591

It’s for a very special occasion, too — I made this dress specifically to wear to the upcoming wedding of a friend I’ve known since kindergarten. :) Yay weddings!

IMG_6568

For the most part, I liked the pattern and would recommend it. The high-low skirt, in particular, is great; the pleats are arranged in just the right way to make the most lovely cascading folds of fabric around in the hem. (Eventually I’d really like to make a Flora skirt!)

However, fitting the wrap bodice gave me quite a bit of trouble; it took 3 muslins to get it right! The main problem was that the vertical bust darts did not point to my bust apex at all, which made the bodice look simultaneously (and weirdly) too big in some places and too small in others. In the end I moved the vertical bodice darts about 1″ towards the center front, which seemed to pretty much solve the problem. (To do this, I literally cut a rectangle around the entire dart on my traced pattern piece, moved it over, taped it down, and filled in the gap with extra tissue.) So, if you too are having trouble fitting this bodice, my advice is to check whether the darts are in the right place for you!

Here’s a quickie sketch of the bodice modifications I made (not to scale at all). See how the vertical dart is closer to center front in the altered version?

FloraBodiceAlterations

In addition to moving the vertical darts and lengthening the horizontal darts accordingly, I straightened out the bottom edge of the bodice a tiny bit. This pretty much had the effect of shortening the front edge of each half of the bodice. This pulls the bodice pieces in closer to the body and helps eliminate gaping.

IMG_6579

I added about 1.5″ of length to the center front of the skirt (tapering to nothing at the side seams), since I had seen other people mention that the high-low hem was, uh, pretty high in the front. I think the length turned out just about right!

IMG_6563

The construction went fairly smoothly. I used the tutorial from the Flora sewalong for stabilizing the wrap bodice edges with twill tape, which really helped eliminate the dreaded gape. I definitely recommend taking the time to do this step, if you make this dress!

The one major change I made was to add a full lining for the skirt, since my skirt fabric wasn’t quite opaque enough for my tastes. This was fairly easy, although figuring out how to deal with the lining at the center back, where the zipper is inserted, took a bit of thought. I eventually opted to sew the zipper only to the outer skirt fabric, and to hand-stitch the center back edges of the lining to the zipper tape, to give a clean finish.

The one mistake I made, which I didn’t even notice until the dress was finished, was to overlap the two halves of the bodice the “wrong” way–it’s supposed to be right-over-left, and I did left-over-right. Oh well! I don’t think anyone else will notice or care.

IMG_6577

I freaking love both of the fabrics I used. The bodice is a white cotton eyelet, underlined with white cotton voile and lined with white mystery cotton from my stash (which may or may not have started life as a bed sheet, I honestly don’t remember). The skirt is a lovely, floaty rayon challis lined with white cotton voile. Everything except the bodice lining was from Stone Mountain and Daughter Fabrics.

IMG_6576

Overall, I’m extremely pleased with how this turned out! It even goes with this awesome purple belt that I already owned, haha. I’m very much looking forward to wearing it to my friend’s wedding in few weeks!

Another plaid shirt (for me this time!)

I finally made an Archer shirt! I think I’m the last sewing blogger in the world to make this pattern, but better late than never.

IMG_6512 - Version 2

The pattern went together fairly easily. I think having just made two button-up shirts for The Boyfriend helped a lot, since I was already familiar with the techniques for attaching the collar and cuffs. The only other tricky part was inserting the sleeve plackets (the technique used in the Archer pattern is completely different from the plackets I’ve made on previous shirts), but once I figured it out it wasn’t that difficult.

IMG_6531

I made a size 6 with a few tweaks. I graded down to a size 0 at the cuffs (either I have extremely skinny wrists, or the cuffs are designed to fit much more loosely than I prefer–could be a bit of both). I also added just a tiny bit (maybe 1/2″) to the hips, just on the back, which seemed to help the back lay flatter.

IMG_6514

I also shaved off about 1/4″ from the top of the armhole to narrow the shoulders a little bit (I think the shoulders are designed to be slightly dropped and loose-fitting, but I wanted the shoulder seams to fall on my actual shoulders). I’m sure there’s a more “correct” way of doing a narrow shoulder adjustment, but this seemed to work fine. I didn’t alter the sleeve-caps themselves at all (the top part of the sleeve that gets sewn into the armhole); the pattern is designed so that there is some ease in the sleeve-caps, so making the armhole slightly bigger by narrowing the shoulders isn’t really a problem.

IMG_6543

I can’t decide if I should go down to a size 4 for my next Archer or not (because there will definitely be a next Archer!). I know this is supposed to be a loose-fitting shirt, but I think I might prefer a slightly slimmer fit. It looks fine when I’m wearing it unbuttoned (which, to be fair, is probably how I’ll wear it 90% of the time), but when it’s buttoned up it looks pretty boxy on me.

IMG_6524

Next time I might go for a size 4, but with the length of a size 6 (or even a tad longer). Next time I’ll also shorten the sleeves just a tad–maybe 3/4″ or so. I’ll probably mostly wear this with the sleeves rolled up, so the length isn’t a big deal, but these sleeves did turn out a little long on me. (From reading other blogs, this seems like a pretty common occurrence with this pattern.)

IMG_6529

The fabric is from Denver Fabrics, and it was marketed as flannel…but it clearly isn’t. It’s not the least bit fuzzy. But it does seem to be cotton and it’s fairly soft and has a tiny bit of stretch, so it worked out just fine. I quite like it!

IMG_6535

I’m pretty proud of the workmanship (workwomanship?) on this. I flat-felled all the seams, so it’s just as neat on the inside as it is on the outside.

IMG_6539

Overall, I’m really pleased with how this turned out! Can’t wait to make my next one–I have some super soft flannel in my stash that’s just calling out to be made into an Archer. :)

IMG_6509

Blue Cotton Cambie

I’m a bit late to this party, since it seems everyone in the sewing blogosphere has already made the Cambie Dress from Sewaholic Patterns… But better late than never!

IMG_1830

This dress has been in my sewing queue since June, when I found this lovely yarn-dyed blue-and-brown cotton in a fabric shop while on vacation in Oregon.

IMG_3377

Isn’t it pretty? The two colors of thread it’s woven from almost make it look iridescent.

IMG_3374

I knew I wanted to make a fairly simple dress with it–I wanted something versatile, and I wanted to let this fabric be the star of the show. I’d also been wanting to try out the Cambie, since everyone else who’d tried it seemed to love it. It seemed like a perfect match! I settled on view A, with the a-line skirt.

IMG_1825

Since Sewaholic patterns are designed for pear-shaped women, and I am decidedly not pear-shaped, I knew I would have to take in the hips quite a bit. I did this by simply grading from a size 10 at the waist to a size 6 at the hips. Adjusting the pockets to account for this required a bit of thought, but wasn’t too hard.

After tracing the pattern and adjusting the hips, I made a full muslin (something I almost never do — sshhh, don’t tell!). This turned out to be a very good thing, because I definitely needed to do some tweaking. I took in the shoulder seams by a good 5/8 inch. I also curved the shoulder seams a little bit more so they would lie flat over my somewhat-rounded shoulders.

The actual sewing went quite smoothly. Tasia’s instructions are great! The only tricky part was putting in the invisible zipper, as I discovered that I don’t actually have an invisible zipper foot for my machine. I ended up inserting it very slowly and carefully with a regular zipper foot. It mostly worked, but it isn’t perfectly invisible.

IMG_1827

Ah well. I’m over it. If anybody else is bothered by the less-than-perfect zipper, that is their problem. (I did ask for a proper invisible zipper foot for Christmas, though, so hopefully I will never have this issue again!)

IMG_1829

Once the dress was mostly constructed, though, I tried it on and found that the top of the bodice was gaping a bit. I hadn’t noticed this on the muslin at all, likely because I didn’t put a lining in the muslin bodice and so it was difficult to tell how it was going to behave in the finished dress.

I debated the possible solutions to this issue, and finally decided to just take in the side seams of the bodice a little bit and hope for the best–by that point, doing anything else would have required more backtracking than I was willing to do. I ended up taking in the front bodice piece by about 1/2″ at the top of the side seam, tapering to nothing at the waistband. I only took in the front bodice piece, not the back, if that makes sense, so the total loss of circumference was just 1″. I think it helped, although it was not the most elegant solution.

I have to say that I’m puzzled about how others have avoided the “gaping bodice” problem with this pattern, since there’s no horizontal bust dart to bring the top of the bodice (above the bust) inwards. Maybe this is less of an issue for those with smaller busts? Thoughts?

If I make another Cambie (and I very well might–it’s a very nice pattern over all!), I think I will convert the bodice to have princess seams instead of darts, like this version from Crafting a Rainbow (found via Pinterest). That will make it much easier to shape the bust to eliminate gaping.

Here’s some inside shots. One thing I really like about this pattern is that the inside turns out just as clean and neat as the outside!

IMG_3378

The bodice is lined with cotton batiste and the skirt is lined with rayon bemberg lining–I wanted the bodice to be nice and breathable, but I wanted to make sure the skirt wouldn’t stick to tights. I also added a self-fabric facing on the bodice, just in case the lining peaked out a little bit (I borrowed that idea from Gertie’s cambie dress).

IMG_3381

There are several other things about this pattern that I really like too! The sleeves/straps are genius: they give the impression of a sleeveless dress, but offer enough coverage that you don’t have to worry about your bra straps showing. The skirt portion is also really flattering, and I love the pocket construction method Tasia uses. I may well be adapting that method for adding pockets to other patterns in the future.

Despite it’s imperfections, I’m still pretty pleased with how this turned out and hope to get a lot of wear out of it. :)

IMG_1826

P.S. I impulse-bought a couple yards of this beautiful wool about a month ago at Stone Mountain and Daughter–what should I do with it? I’m thinking pencil skirt, but I am open to suggestions. Relatedly, what’s your absolute favorite pencil skirt pattern?

IMG_3370

Shirtmaking #2: The finished shirt (finally)!

Guys? Guys. I made a shirt! From a pattern I drafted myself!

IMG_3269
I’m pretty excited.

IMG_3282
Check out that beautiful flat felled side seam and narrow hem (this photo is of the inside of the shirt).

Is it perfect? Goodness no. It has some issues, for sure. But for a first attempt, I’d say it was a success.

IMG_3280
More pretty flat felled seams. This is where the side seam and armhole seam meet (again, on the inside of the shirt).

Most importantly, The Boyfriend likes it. :) I can tell because he’s worn it several times, with no convincing from me. He actually wore it to work the day after I finished it!

IMG_3305

IMG_3309
(As usual, excuse the terrible photography. If I get some better shots of the shirt in action soon, I’ll post ’em.)

I’m still debating whether to add pockets. And if so, with or without pocket flaps. Opinions?

Anyway, here are the gory details:

1. The custom pattern drafting/draping methods in David Coffin’s book really do work. I was pleasantly surprised at how well this ended up fitting! There are a few tweaks I want to make next time, though — mostly lengthening the shirt body a little, lengthening the sleeves, and making the cuffs a little narrower (I had to make these cuffs wider than I planned after discovering I’d cut the sleeve pieces a little too short).

IMG_3273
The sleeve plackets turned out pretty well though, if I do say so myself.

2. This fabric is really nice and soft, but cutting it out was a royal pain. I don’t know if it was this way when it arrived from Mood, or if it somehow got stretched out when I pre-washed it, but the vertical and horizontal stripes were not at perfect right angles to each other. They are woven stripes, not printed, but somehow the warp and weft threads of the fabric just weren’t perpendicular, and no amount of ironing completely solved the problem. This meant that I had to choose which was more important — perfect vertical stripes, or perfectly level horizontal stripes. I chose perfect vertical stripes, but this made matching up the side seams and the center front…difficult. You can see that the front button band didn’t end up matching at the center front perfectly. In hindsight I wish I’d cut it on the bias to avoid that problem. Ah well.

IMG_3293
A view of the collar. Not perfect, but pretty good, I think!

3. Another issue I only noticed after it was too late to fix: I cut the back upside down. That is, the pattern goes the opposite way on the back as it does on the front. I’m somewhat reluctant to bring this up because I honestly don’t think anyone would ever notice if they didn’t already know–it’s practically impossible to tell. But I want to be honest with y’all, so…now you know. Call it a design feature?

4. As far as construction goes, I used a combination of David Coffin’s methods and Peter’s instructions from his men’s shirt sewalong. Peter’s methods are generally simpler and seemed to give perfectly adequate results, so I mainly stuck with those. I’m planning to write up instructions on exactly what I did so I can replicate it all next time. Maybe I’ll post those instructions up here at some point.

IMG_3290
I’m pleased at how this turned out, but also pleased to be done with it. I’m working on a quick and simple project for myself at the moment — sort of a sewing palate cleanser. But after that I’m looking forward to making another shirt, and correcting all the mistakes I made this time!

Have you made a men’s shirt? Any tips? Let me know if the comments. :)

Summer Bathrobe

Remember this?

IMG_3050
I finally completed the project I bought this fabric for. Super simple, but super satisfying (to me, anyway).

Behold: a bathrobe.

IMG_3204
I’ve been wanting to make myself a lightweight summery bathrobe for ages. I have a big fluffy robe that I use in the winter, but it’s way too warm for summer. I wanted something I could throw on after I get out of the shower or while lounging around my apartment on weekend mornings.

IMG_3234
I definitely wanted it to be cotton, so it would dry quickly if I wore it after showering. And I definitely wanted it to be opaque enough that I could walk around my apartment in it without worrying about whether the curtains were open. :P So, I figured this would actually be a perfect opportunity for using a quilting cotton in a pretty print. I mean, more drapey-ness would probably be nice (quilting cottons are usually a little stiff), but it’s just so easy to find pretty quilting cottons, and I don’t normally have much opportunity to use them, so…

IMG_3213
Both of these fabrics are from Stone Mountain and Daughter Fabrics in Berkeley. Being cotton, it wrinkles ridiculously quickly and easily, but normally I really don’t care if my bathrobe is wrinkly, you know? Unless I’m showing it strangers on the internet–then I make sure to iron it. :P

IMG_3221
Anyway, the pattern is Burda 7297. I mostly liked it–it’s pretty simple, which is what I wanted. The topstitching detail at the back is a nice touch, as is the fact that the ties are permanently attached to the robe rather than just strung through belt loops.

IMG_3241
IMG_3242
IMG_3233
The band along the neck and front of the robe is drafted kind of weirdly, though–the pattern piece for the band is just a long skinny rectangle that you sew along the edge of the neck and front pieces. Because there’s no shaping in the band, unless your fabric is extremely drapey, it doesn’t lie flat like it appears to in the pattern envelope photos. It sticks up awkwardly around your neck instead. If I were going to make this pattern again, I would put some thought into how to draft a better front band. For this version, I just took a couple of darts out of the front band at each side of the neck and hoped it would look marginally intentional (please don’t tell me if it doesn’t). This is a bathrobe, after all, not a ball gown. Precision sewing not required.

IMG_3208
Other than that, the only alterations I made to the pattern were to add 3 inches to the length and omit the inner tie (although I may go back and add the inner tie at some point–we’ll see).

I finished the seam allowance with a simple zig-zag. (I do actually own a serger, but it’s currently hanging out at my parents’ house, since I don’t really have room for it here.)

IMG_3243
And I finally learned how to use the “overedge” foot on my sewing machine to do this. It has two little wires that keep the edge of the fabric flat so it doesn’t pucker while you’re zig-zagging it. Genius.

IMG_3244
Also, I am still working away on the button-up shirt for The Boyfriend. After realizing that the commercial pattern I bought was going to have to be significantly altered to fit him, I decided to just start from scratch. So, I draped a custom pattern (!) for him using the method in David Page Coffin’s book, and it seems to have worked like a charm (although I’m still tweaking it a little bit, trying to get the armscye just right). Next up: drafting/copying a pattern for the collar. :)

And last but not least…I’m going to be out of town Saturday-Wednesday, so if you leave me a comment during that time, it may not be posted until I get back. But please don’t let that deter you from leaving me comments, okay? Okay.

Pre-Blog Projects: Post #2

I think it’s high time I showed you guys some more of my finished projects from before I started this blog! Just like last time, I’m limiting this to garments I still actually wear at least occasionally. I have some dresses and a top to show you today! Let’s get right to it.

1. Orange Paisley Dress

IMG_3117
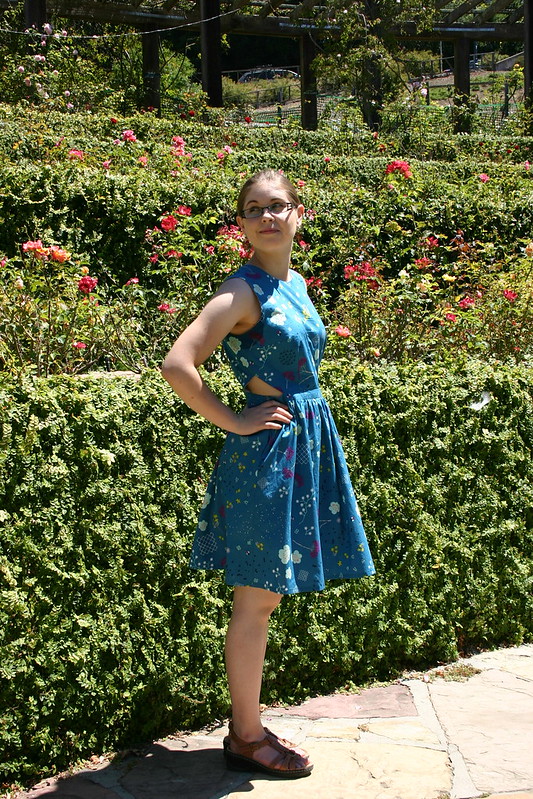
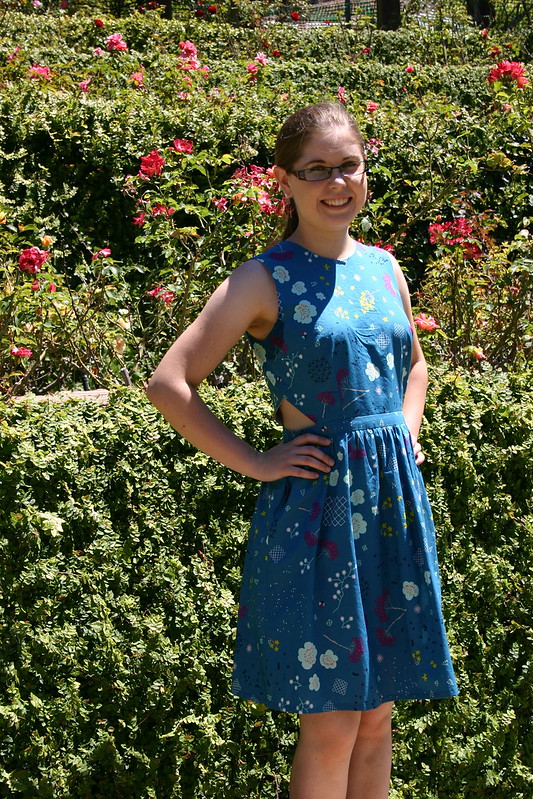
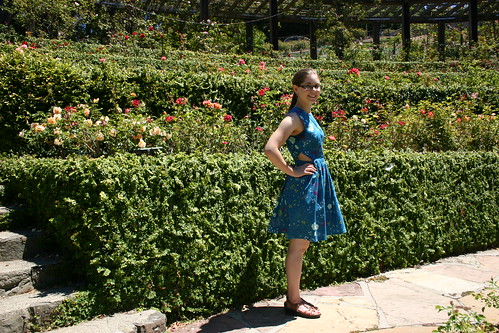
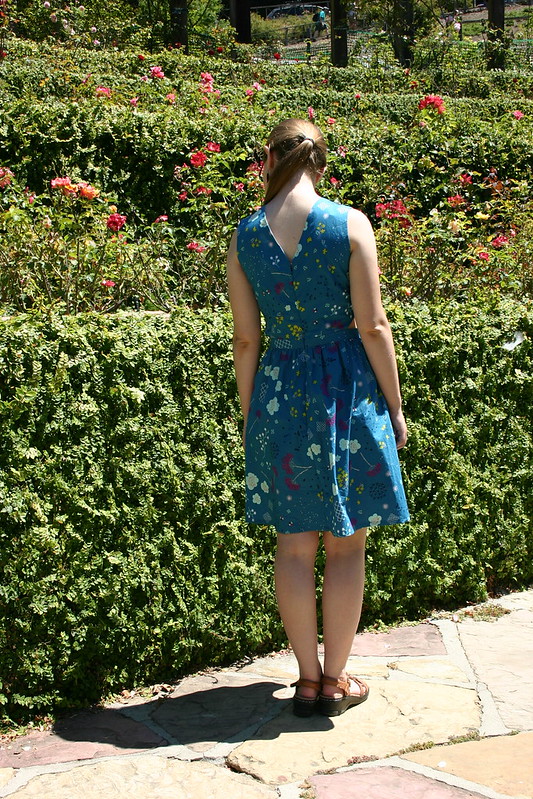
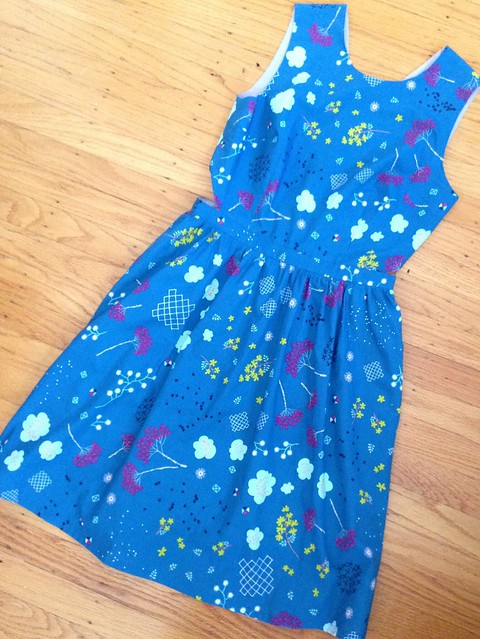
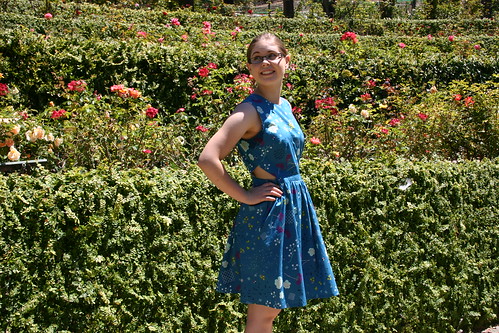
I made this with quilting cotton that my mom had originally purchased to make a chair cushion out of. (Yes, I did ask her first if I could steal it to make a dress.) The bodice and skirt are both lined with some plain white cotton I had in my stash.

IMG_3087
The pattern is Simplicity 5112, which is out of print now–here’s the Pattern Review page. I remember having to take in the back and side seams of this dress quite a bit, and I added the ruffle at the bottom to make it just a tad longer–originally it was just a couple inches shorter than I generally find is practical for everyday wear. :P I also added piping around the edges of the bodice and above the ruffle, to break up the busy print a little.

IMG_3100
I actually still really like this dress, and wear it a lot–it’s super comfy, and cool on hot summer days since it’s all cotton. I also really appreciate that I can wear it pretty comfortably without a bra since the bodice is fully lined–no need to keep rearranging things throughout the day to make sure my bra isn’t showing!

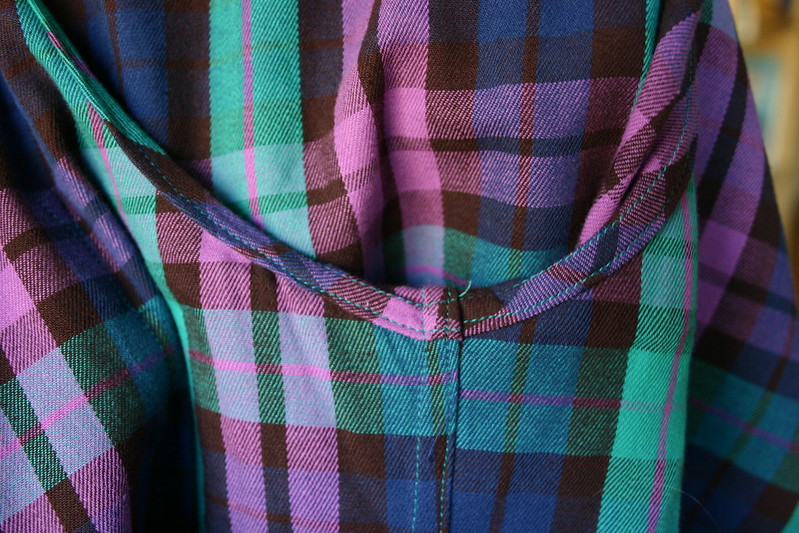
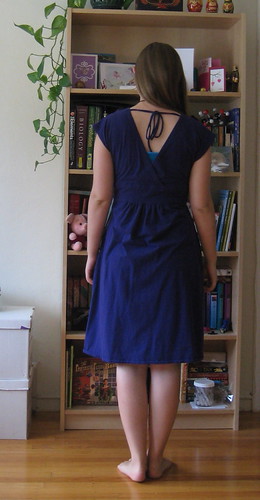
2. Purple Knit Dress

IMG_2967
This is Simplicity 3503, which you’ll be happy to know is still in print. The fabric is a remnant of jersey knit I found at Britex in San Francisco a couple years ago.

IMG_2957
The only adjustment I made to the pattern was to raise the front and back neckline quite a bit (like, 1.5 inches). I was aiming to be able to wear this dress comfortably without a camisole underneath, but, as you can see, I didn’t quite achieve that goal. Next time I make this I’ll raise the neckline another inch or so, I think. Still, I think it turned out pretty well! (Also, I notice that the hem is doing a wear flip-to-the-outside thing in these photos–probably should have ironed the hem before taking pictures. Ah well. Forgive me.)

IMG_2952
Also, you get two different photo backgrounds today–I’m still experimenting and trying to figure out the best set up for taking pictures of myself in my apartment!

3. Jeans Dress

IMG_3153
I made this dress on a whim several years ago, out of three pairs of old jeans and some quilting cotton from my stash. I think I was inspired by something I saw on So, Zo…What Do You Know?, though I can’t find the exact post again to show you.

IMG_3168
I used a Simplicity pattern for a basic strapless dress with princess seams as a guide for cutting out the panels (although I did a lot of adjusting to account for the fact that the flatfelled seam running down the center front, which is from the original pair of jeans the panel is cut from, is actually curved rather than perfectly straight, and slightly asymmetrical…), and made up the rest as I went along. I like the concept of this dress, but the construction is a little shoddy, and it turned out a bit too tight at the top of the bodice. One of these days I should see if I can let it out a little bit so it’s more wearable.

4. Parasol Top

IMG_3177
This is Simplicity 0661, which is out of print–here’s the pattern envelope:

IMG_1383
I don’t think I adjusted the pattern much at all, except to make the straps cross in the back so they would stay up on my shoulders more reliably.

IMG_3184
Also, you get to see some of my hats in this photoshoot. Because, I like hats, and I am the boss lady around here. :P

IMG_3186
And here are some detail shots of the trim I used, which was from my grandmother’s stash (so, definitely vintage–I have no idea how old it is, though). Isn’t it darling? I was so excited when I found it, because I think it goes perfectly with the parasol print on the fabric–don’t the little circles on the trim look just like the tops of little parasols?!

IMG_3197
IMG_3199
IMG_3200
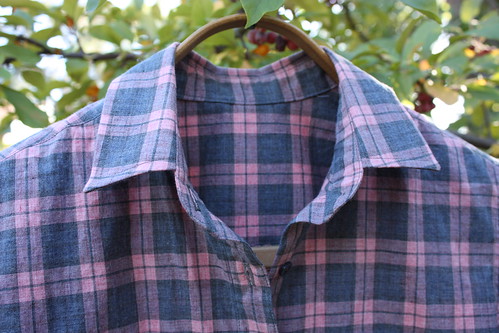
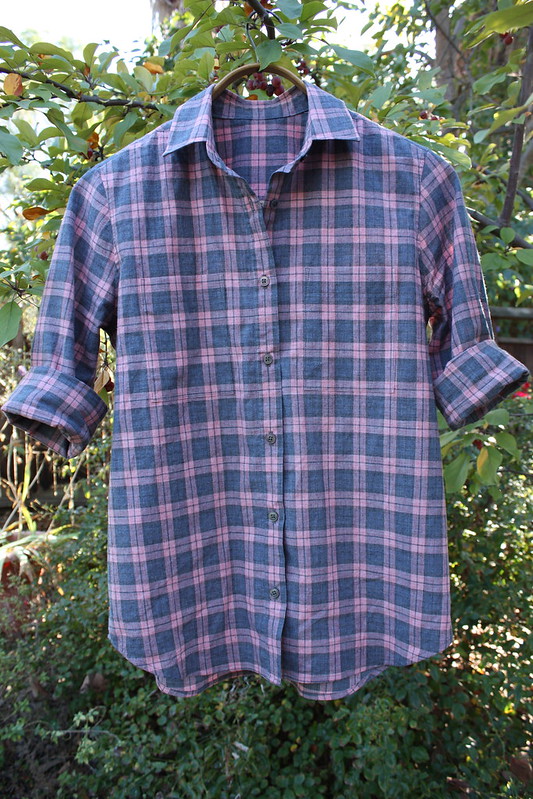
Oh, and lastly…look what came in the mail a few days ago!

IMG_3170
Yay! This seems to be widely regarded as the bible of shirtmaking, and is certainly living up to its reputation so far. I’m about halfway through, and can’t wait to finish reading it and then actually start using my newfound shirtmaking knowledge. I’ll keep you posted on how that all goes.

IMG_3171
It has detailed instructions for draping your own custom shirt pattern, which is awesome.

IMG_3175
And it includes patterns for details like collars, cuffs, plackets, etc. Sweet.

Okay, that’s it for now! Catch you later.

Where has all the shirting gone?

Dear readers, for the last several days I have been searching for somewhere to buy attractive and good quality cotton shirting for men’s button-up shirts. It’s been more difficult than I anticipated! Here are the results of my investigations, in case y’all are interested.

Shirting from Mood Fabrics (Click the image to see this fabric on Mood's website.)

Shirting from Mood Fabrics
(Click the image to see this fabric on Mood’s website.)

(And if you just want to see all the fabrics and skip the explanations, here’s the pinterest board I put together. And here’s one for flannel shirt fabrics, if you’re into that.)

Why am I looking for men’s shirting, you ask? I promised The Boyfriend I would make him a button-up shirt for his birthday — partly because it’s hard for him to find ready-to-wear shirts that actually fit him well (he’s quite thin, so even the smallest sizes are usually too baggy on him), and partly because I think it will be a fun challenge for me!

Shirting from Mood Fabrics (Click the image to see this fabric on Mood's website.)

Shirting from Mood Fabrics
(Click the image to see this fabric on Mood’s website.)

I looked for shirting at my local brick-and-mortar fabric store, Stone Mountain and Daughter, but didn’t find much–they have one small bookshelf-sized area devoted to shirting, and none of it really appealed to me. So, to the internet I went!

I started by consulting this post from Peter over at Male Pattern Boldness (which I found while reading through the old posts from the men’s shirt sew-along he hosted a couple of years ago, to pick up tips on shirt construction). The online sources Peter recommends for cotton shirting are Fabric Mart, Gorgeous Fabrics, and Fabric.com. I also checked out DenverFabrics.com.

Most of these had a pretty limited selection, once I filtered out everything that was too loud, too pink, or just too weird for my boyfriend to consent to wear it in public. :P I did find a few that I liked at each of these though. And they’re cheap — most shirtings on these sites were $5-$8 per yard.

Next I check out Britex’s online store. They do have some beautiful shirtings, but they’re 4 or 5 times more expensive than anything else I’d found, which seemed a little ridiculous.

And then, dear readers, I checked out the shirting section online at Mood Fabrics. Holy moly! So THIS is where all the attractive and reasonably-priced shirting went! (And no, I am not being compensated by Mood to write this. :P I wish. Heh.) Here are some of my faves (more are up near the beginning of this post) — most of these are between $8 and $16 per yard, which seems reasonable to me.

Shirting from Mood Fabrics (Click the image to see this fabric on Mood's website.)

Shirting from Mood Fabrics
(Click the image to see this fabric on Mood’s website.)

Shirting from Mood Fabrics (Click the image to see this fabric on Mood's website.)

Shirting from Mood Fabrics
(Click the image to see this fabric on Mood’s website.)

Shirting from Mood Fabrics (Click the image to see this fabric on Mood's website.)

Shirting from Mood Fabrics
(Click the image to see this fabric on Mood’s website.)

Shirting from Mood Fabrics (Click the image to see this fabric on Mood's website.)

Shirting from Mood Fabrics
(Click the image to see this fabric on Mood’s website.)

Shirting from Mood Fabrics (Click the image to see this fabric on Mood's website.)

Shirting from Mood Fabrics
(Click the image to see this fabric on Mood’s website.)

Shirting from Mood Fabrics (Click the image to see this fabric on Mood's website.)

Shirting from Mood Fabrics
(Click the image to see this fabric on Mood’s website.)

Any other good online fabric stores I missed (with or without lots of cotton shirting)? Let me know in the comments. :)

That’s all for today! I’m off to cut out a muslin of Burda 7045. I’ll let you know how it goes!

IMG_3056