A Floral Flora

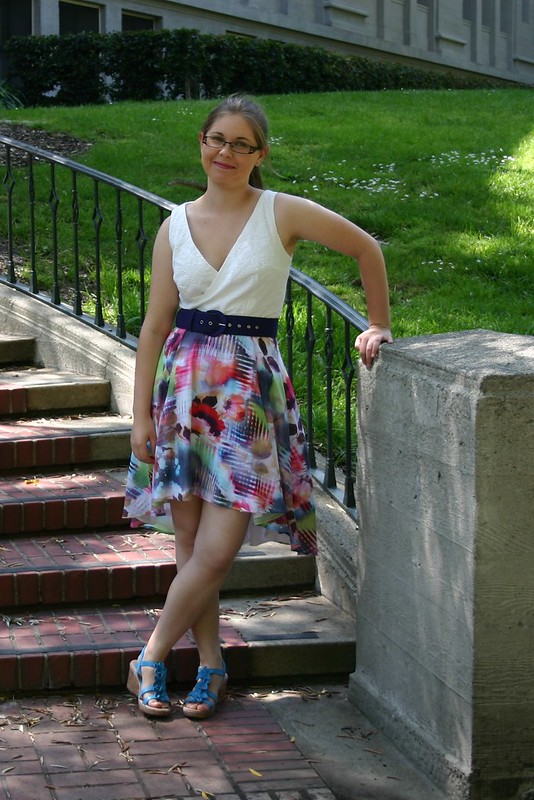
I’m pretty excited about this dress. :)

IMG_6570

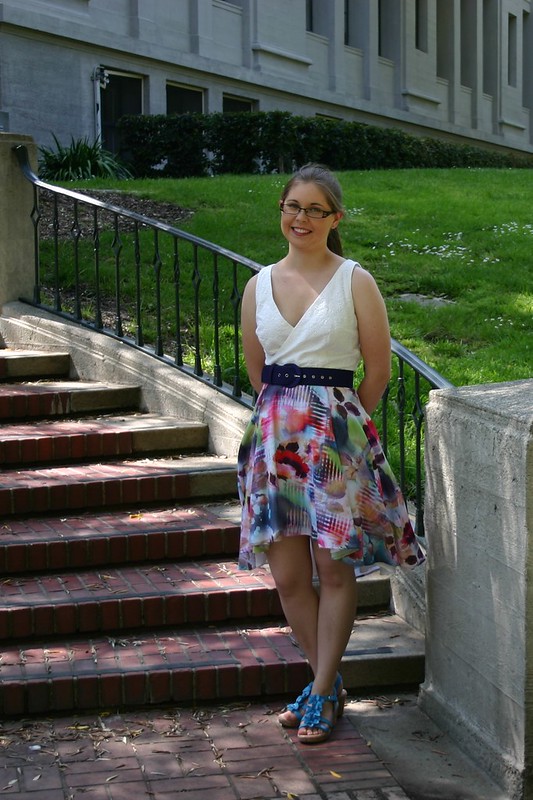
This is the Flora Dress by By Hand London. It’s a combo of the wrap bodice from version 1 and the high-low skirt from version 2.

IMG_6591

It’s for a very special occasion, too — I made this dress specifically to wear to the upcoming wedding of a friend I’ve known since kindergarten. :) Yay weddings!

IMG_6568

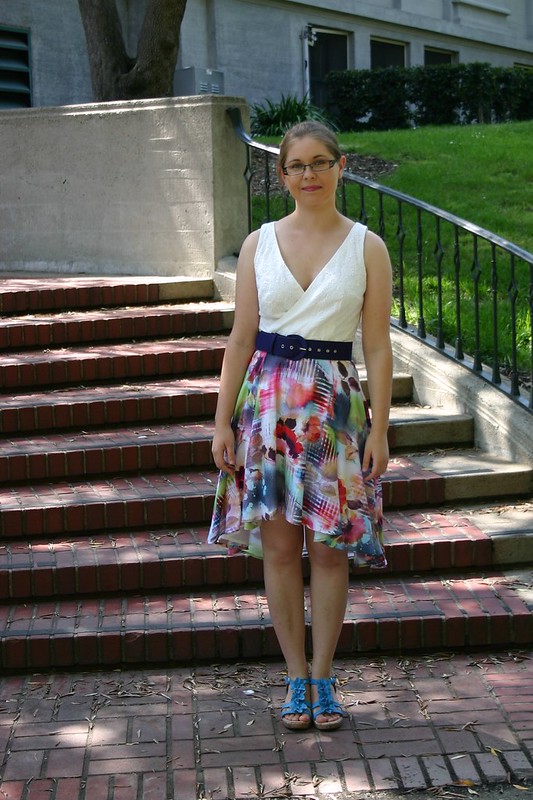
For the most part, I liked the pattern and would recommend it. The high-low skirt, in particular, is great; the pleats are arranged in just the right way to make the most lovely cascading folds of fabric around in the hem. (Eventually I’d really like to make a Flora skirt!)

However, fitting the wrap bodice gave me quite a bit of trouble; it took 3 muslins to get it right! The main problem was that the vertical bust darts did not point to my bust apex at all, which made the bodice look simultaneously (and weirdly) too big in some places and too small in others. In the end I moved the vertical bodice darts about 1″ towards the center front, which seemed to pretty much solve the problem. (To do this, I literally cut a rectangle around the entire dart on my traced pattern piece, moved it over, taped it down, and filled in the gap with extra tissue.) So, if you too are having trouble fitting this bodice, my advice is to check whether the darts are in the right place for you!

Here’s a quickie sketch of the bodice modifications I made (not to scale at all). See how the vertical dart is closer to center front in the altered version?

FloraBodiceAlterations

In addition to moving the vertical darts and lengthening the horizontal darts accordingly, I straightened out the bottom edge of the bodice a tiny bit. This pretty much had the effect of shortening the front edge of each half of the bodice. This pulls the bodice pieces in closer to the body and helps eliminate gaping.

IMG_6579

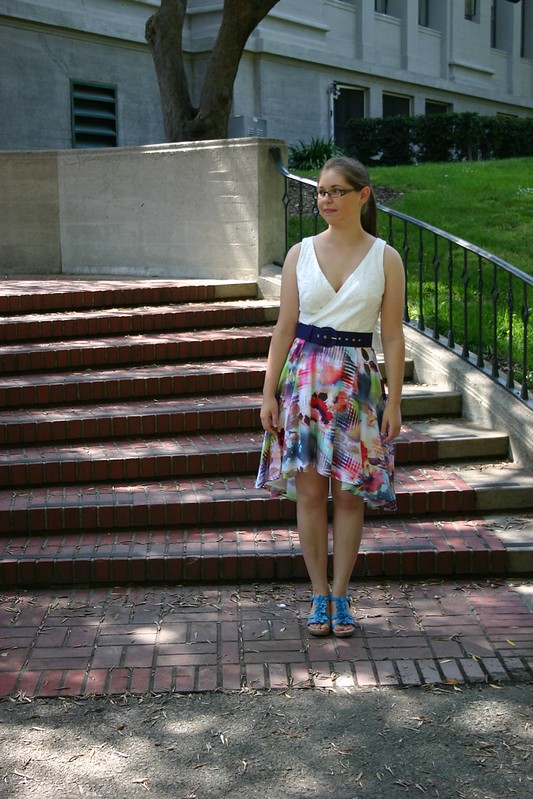
I added about 1.5″ of length to the center front of the skirt (tapering to nothing at the side seams), since I had seen other people mention that the high-low hem was, uh, pretty high in the front. I think the length turned out just about right!

IMG_6563

The construction went fairly smoothly. I used the tutorial from the Flora sewalong for stabilizing the wrap bodice edges with twill tape, which really helped eliminate the dreaded gape. I definitely recommend taking the time to do this step, if you make this dress!

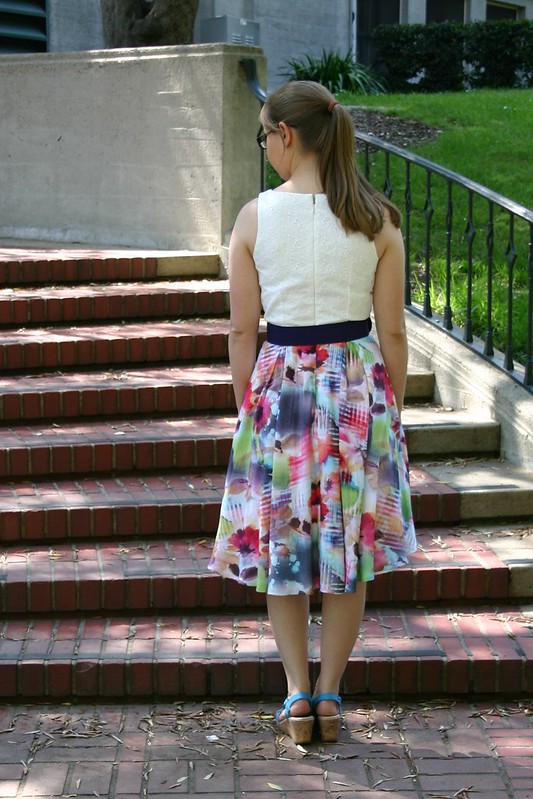
The one major change I made was to add a full lining for the skirt, since my skirt fabric wasn’t quite opaque enough for my tastes. This was fairly easy, although figuring out how to deal with the lining at the center back, where the zipper is inserted, took a bit of thought. I eventually opted to sew the zipper only to the outer skirt fabric, and to hand-stitch the center back edges of the lining to the zipper tape, to give a clean finish.

The one mistake I made, which I didn’t even notice until the dress was finished, was to overlap the two halves of the bodice the “wrong” way–it’s supposed to be right-over-left, and I did left-over-right. Oh well! I don’t think anyone else will notice or care.

IMG_6577

I freaking love both of the fabrics I used. The bodice is a white cotton eyelet, underlined with white cotton voile and lined with white mystery cotton from my stash (which may or may not have started life as a bed sheet, I honestly don’t remember). The skirt is a lovely, floaty rayon challis lined with white cotton voile. Everything except the bodice lining was from Stone Mountain and Daughter Fabrics.

IMG_6576

Overall, I’m extremely pleased with how this turned out! It even goes with this awesome purple belt that I already owned, haha. I’m very much looking forward to wearing it to my friend’s wedding in few weeks!

Wardrobe Architect (weeks 7 & 8)

More Wardrobe Architect talk today! (See, I haven’t forgotten, even though I am atrociously far behind…)

The Wardrobe Architect

Week 7 was all about prints and patterns vs. solid colors, and figuring out which types of prints we like wearing.

IMG_2711

IMG_6537

I’d say that my favorite and most-worn garments (me-made and otherwise) are about half prints and half solids. I don’t do a lot of print mixing — I tend to pair printed tops with solid bottoms or vice versa, or just go for all solid colors. This made me realize that I could stand to make/acquire more solid-colored blouses and t-shirts for wearing with patterned skirts.

IMG_2710

IMG_2717

In terms of types of prints, I tend to go for organic-looking patterns, florals, and novelty prints. I don’t really care for strong geometric prints on me, except for stripes. Oh, and plaids are really nice for button-up shirts! In this post I’ve included a sampling of prints from my favorite garments and fabric pieces from my stash. I think lately I’ve actually done very well at steering clear of prints that I love the look of on a bolt of fabric, but don’t actually like to wear.

IMG_6552

IMG_2713

Week 8 was all about hair, makeup, and other beauty products and routines. This is an area of personal style I’d like to explore more! I’ve pretty much always had long hair. I like it, but I’d be interested try short hair to see what it’s like.

I’ve only just started dipping my toes into the world of makeup–somehow I missed the memo on this in high school and college. (I’ve found lurking in r/makeupaddicts to be very educational in this regard, by the way.) I suppose my core, essential makeup products at this point are foundation; black mascara; neutral, brown-ish eye shadows; and pinkish lip colors. The amount of makeup I put on really depends on the day. I actually enjoy doing a full face with foundation and everything, but realistically I don’t bother most of the time. (I still need to acquire some kind of really light foundation/bb cream/tinted moisturizer for days when real foundation seems like too much… Recommendations?) As with clothing, if something takes a huge amount of effort to put on or wear, I can’t be bothered most of the time. And that’s fine with me. :)

Tropical Sorbetto

Remember when I said I was working on a quick and simple project for myself, as a “sewing palate cleanser” after working so hard on the button-up shirt? Well, I finished it!

IMG_3344

This is the Sorbetto blouse pattern from Colette Patterns. It’s a quick and easy pattern to put together, is a great wardrobe staple, and you can download it for free from the Colette Patterns website! YES! I love free patterns!

IMG_3334

The fabric might look familiar if you’ve been reading my blog for a while. I made this with the scraps from the Tropical Cascade skirt I made earlier in the summer. I wasn’t sure I had enough fabric left to cut this out, but with some creative piecing I found I had more than enough to cut out all the pattern pieces for this top AND make some matching bias tape to finish the neck and armholes. Yay!

IMG_3329

You can see that I had to add a seam down the back–I didn’t have a scrap big enough to cut the entire back pattern piece. I don’t think it’s terribly noticeable, though.

IMG_3346

And here’s a shot showing how I had to piece the front. In this photo I’m lifting up the edge of the pleat that runs down the front of the blouse. The front is supposed to be cut as one piece, but I ended up cutting it in three pieces to fit on my available fabric. Luckily I could piece it right under the pleat, so no one need know (except you guys)!

IMG_3350

I actually really enjoyed making the bias tape to finish the edges. I followed the continuous bias tape tutorial from Colette (they include a link to this in the pattern instructions). I’m now looking forward to finding excuses to make more bias tape using this technique–it’s seriously like magic. I don’t think I can describe it well enough to do it justice, but you should check it out if you ever need custom bias tape.

IMG_3338

IMG_3341

I’m especially proud of the insides. I used French seams, so there are no raw edges to be seen! Here it is inside out to prove it:

IMG_3351

So neat! So tidy!

And here’s the neckline, showing the bias tape, the front pleat, and the French seam down the back:

IMG_3345

And here’s the inside of one of the shoulders…

IMG_3358

…And the outside for comparison. Equally attractive!

IMG_3349

I think it came out quite nicely! If I make this pattern again, I might add just a touch of extra length–maybe 3/4″ or something (I like my tops on the long side, plus I think I have a relatively long torso to begin with). But other than that I’m really pleased.

IMG_3340

I thought about putting some buttons or something down the front, but I eventually concluded it was best to just let this fabric speak for itself.

IMG_3335

Of course it’s just starting to get cold here, so I probably won’t get to wear this much until next summer… Ah well. I have a few more autumn-appropriate projects in the works. Hopefully I can finish them before spring!

P.S. Do you like the new blog layout? I decided I needed a theme with sidebars, so as to make the archives and such more accessible. I think I like it (especially now that I’ve figured out how to use the same color scheme I was using before…)!

Tropical Cascade Skirt

I finished my first sewing project of the summer last week!

Cascade2
This is the Cascade Skirt pattern by Meagan Nielsen. Over the past few months I’d seen several beautiful versions of this skirt pop up around the blogosphere, but I hadn’t really thought seriously about buying the pattern–it just didn’t seem like the kind of thing I was likely to wear, you know? But then I found this amazing tropical floral rayon at Stone Mountain and Daughter Fabrics a few weeks ago, and I knew immediately that it had to be made up into a Cascade. Aren’t they just a perfect match?

Cascade fabric
Cascade pattern
This skirt came together really quickly and easily–it took me three or four evenings, from cutting to sewing on the buttons (and most of that time was spent doing the rolled hems on the outer fabric and the lining). Definitely an instant gratification project (which is great)! Here’s a close-up of the inside of the rolled hem, and a French seam:

Cascade8
I only made a few minor adjustments to the pattern. First, I added a back seam. The cutting layout included in the pattern has you cut the back piece on the fold, but to do that you have to fold the fabric perpendicular to the selvedge, which means that if the print on the fabric is directional at all, it will be sideways on your skirt. Most of the time this wouldn’t matter at all, but the flowers on my fabric all face one direction, and I really wanted them to be facing up instead of sideways. So I just added 5/8″ seam allowance, cut 2 back pieces, and sewed them together with a French seam. I don’t think it’s noticeable at all–and if it is, that’s okay, because those French seams are pretty gorgeous, if I do say so myself. Here’s a close-up of the inside of the skirt back seam:

Cascade9
I also added a lining, because I wasn’t sure whether this rayon would wind up being slightly see-through or not. In hindsight it probably wasn’t necessary, but it wasn’t too difficult to do and it sure feels nice and silky on my skin. Here’s the inside of the finished skirt (all wrinkly from being worn all day–forgive me):

Cascade10
The pattern includes instructions for a lining, but it instructs you to use the same pattern pieces for both the outer fabric and the lining, which means that the lining fabric will be very visible due to the high-low hem. I didn’t want my lining to show (I didn’t want to cover up that fantastic print!), so I just shortened the pattern pieces enough that I was confident the back lining would be shorter than the front of the skirt. I also made the lining a little shorter around the waist, so the lining fabric would be less likely to peak out from the front of the skirt. I think it worked pretty well. (The lining fabric is rayon bemberg lining ordered online from Mood Fabrics–specifically, I think it’s this one.)

Other than that, I pretty much followed the directions exactly. I’ve seen several versions of this skirt that were shortened in the back a little bit, but I like the extra long back–it’s dramatic, certainly, but in a good way!

The pattern includes three waistband options (tie-in-the-front, tie-in-the-back, and button-up), and I chose the option with buttons. I also added a snap for some extra security.

Cascade7
The buttons are purple plastic, inherited from my grandmother in her enormous stash of sewing supplies. They’re definitely vintage, although I’m not sure what decade they’re from. In real life they’re a beautiful rich purple, although for some reason they look more blue-ish in these photos. You’ll just have to take my word for it.

Cascade6
Here are some terrible self-timer photos I took right after I finished it, just to give you an idea of what it looks like close up…

Cascade13
Cascade12
And here’s some more artsy photos of the skirt in action in the rose garden this afternoon.

Cascade1
Cascade4
Cascade3
The back is kind of wrinkly from sitting on a bench in the rose garden right before this…oh well.

Cascade5
It’s very twirly and billows beautifully when you walk!

This is a great, simple pattern, and I wouldn’t be at all surprised if I ended up making it again. My only complaint is that it really isn’t suitable for windy conditions, unless you wear bike shorts underneath or something. :P That being said, I love my new skirt, and I’m sure I’ll get a lot of wear out it. Definitely a successful project!

And just for fun, here’s a pretty photo I took in the rose garden this afternoon:

pink and yellow roses